Intro to java programmingSetting up the JDK and IDE
All steps can be done on Linux but I’ll be guiding through the windows setup, you need to install a JDK. We can get this over at:
https://www.oracle.com/java/technologies/downloads/On Windows, double click the exe you’re given and this will mostly set it up for yourself, the install path will likely be:
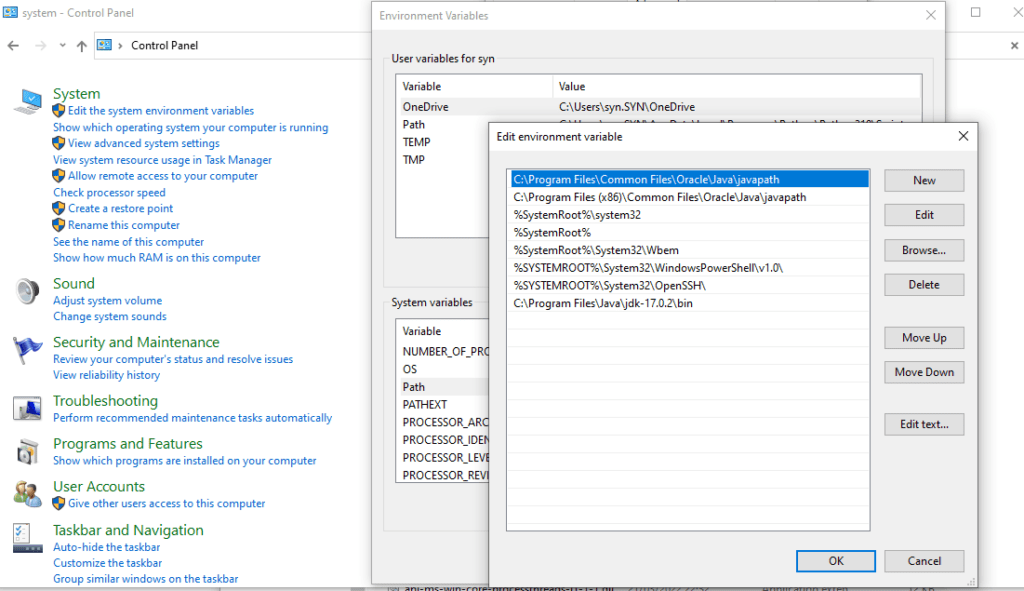
C:\Program Files (x86)\Java\jre1.8.0_321\binThis contains all the tools necessary for developments. We can add the directory to our $PATH variable:

We also need an IDE, we can do that with software such as Eclipse:
https://www.eclipse.org/downloads/download.php?file=/oomph/epp/2022-03/R/eclipse-inst-jre-win64.exeWe just run the executable and go through the setup functions (just click next a bunch of times). It should open up to a welcome page. To create a new project, select the project option in the top left:

Click Java project and go through the setup instructions:

For now, just click Finish after that. A folder should be created containing a src sub directory. Right click and hover over new. A box should pop up, select Class:

We’re then prompted to create a class, select the following options for the main file:

We add the public static main tick box as we would need to manually create this anyways.
Hello, World!
We can try printing out some text to the console as our first program. We do this using System.out.println, this ensures we’re printing a new line every time we use this:
public class Main {

	public static void main(String[] args) {
		System.out.println("Hello, World!");

	}

}
We have our class with one function inside this. Our function prints out the line Hello, World!. Pretty simple. It’s also worth noting that text or “strings” are encased with quotation marks and lines are ended with semi colons.
Variables
A variable is a method we used to refer to a store of data in a program. This can be used to hold values such as strings, integers, floats, etc. In Java, we have to state what data type will be stored in each variable before assigning a value. A few examples:
int number = 5;
float decimal = 5.99f;
char character = 'D';
boolean bool = true;
String text = "Hello, World";
These can also be manipulated using operators. Such as adding two integers:
public class Main {

	public static void main(String[] args) {
		int x = 2;
		int y = 3;
		int total = x + y;
		System.out.println(total);
	}

}
This also displays back to use the total.
User input
For user input, we need to import a utility called Scanner, this helps us parse the System.in input as a use-able string:
import java.util.Scanner;
public class Main {

	public static void main(String[] args) {
		Scanner userInput = new Scanner(System.in);
		System.out.println(userInput.nextLine());
	}

}
We start by creating a new scanner variable, Scanner is a custom data type and is initiated with new. userInput is now a scanner and can be used to take user information. The .nextLine() function takes one line of input and stores it. In our case, we immediately echo this back to the user. We can also read different data types, such as integers and doubles. A simple calculator can be made using the following:
import java.util.Scanner;
public class Main {

	public static void main(String[] args) {
		Scanner userInput = new Scanner(System.in);
		double x, y, ans;
		System.out.println("Enter your first number: \n");
		x = userInput.nextDouble();
                System.out.println("Enter your second number: \n");
		y = userInput.nextDouble();
		ans = x + y;
		System.out.println("Total = : " + ans);
	}

}
Conditions
Potentially the most important part of programming is conditions. They decide the flow of a program depending on conditions such as user interaction, values and more. Following from our previous example. We can use if, else and else if statement to determine what will happen if the sum falls above, between or under a range:
import java.util.Scanner;
public class Main {

	public static void main(String[] args) {
		Scanner userInput = new Scanner(System.in);
		double x, y, ans;
		System.out.println("Enter your first number: \n");
		x = userInput.nextDouble();
		System.out.println("Enter your second number: \n");
		y = userInput.nextDouble();
		ans = x + y;
		if(ans <=10) {
			System.out.println("Your value was under 11");
		}else if(ans == 11){
			System.out.println("Your value was 11");
		}else {
			System.out.println("Your value was above 11");
		}
	}

}
Notice the syntax. We have a query, a condition then a code block to be executed if the condition is met. The condition is to be held between the parenthesis and will always evaluate to either true or false. Else is the exception, where all conditions that weren’t previous met will result in the execute of the code inside else’s code brackets:

Switch case
Java has another conditional method that functions a little differently from if, else if, else. Switch is intended for conditional jumps, however switch statements are better for matching data such as numbers. Switch statements are also more efficient than if-else when the condition table is over 5 conditions. Any example would be:
import java.util.Scanner;
public class Main {

	public static void main(String[] args) {
		Scanner userInput = new Scanner(System.in);
		System.out.println("Enter a number: \n");
		int x = userInput.nextInt();
		String output;
		switch(x) {
		case 1:
			output = "You entered one";
			break;
		case 2:
			output = "You entered two";
			break;
		case 3:
			output = "You entered three";
			break;
		default:
			output = "Your value was over three";
		}
		System.out.println(output);
	}

}
We go through each value of x and check it against a fix value defined beside case. If the case is matched, we execute until we reach a break; The exception to this is default which is the result when no condition is matched from previous cases.
While loops
While loops are used to repeat code while a condition is true. For example:
import java.util.Scanner;
public class Main {

	public static void main(String[] args) {
		int i = 0;
		while(i < 10) {
			System.out.println(i);
			i ++;
		}
	}

}
I have an integer variable called i. While i is less than 10. Print the value of i and increment by one using the ++ operator, we could also use i = i + 1; but it doesn’t look as tidy. Below is a flow chart of execution:
For Loop
For loops are similar to while loops, they run until a condition is met. The main difference is that the iteration starts at the beginning of the loop, meaning all code inside the code block will be executed before next incrementation. Below is a flow chart of execution:


